
About Toad Data Point
Toad is a multi-platform database query tool built for anyone who needs to access data, understand data relationships, and quickly produce Reports.
See the detailed help below.
 Collapse All
Toad Data Point provides native database connections to the following database providers:
- Oracle
- SQL Server
- DB2 (LUW and z/OS)
- Sybase ASE, Sybase IQ, and Sybase SQL Anywhere
- Teradata
- MySQL
Toad also allows you to create an ODBC connection to a database that supports an ODBC 3.0 (or later) driver. However, an ODBC connection may not be as full-featured as the native connection, so Toad recommends using the native connection whenever possible.
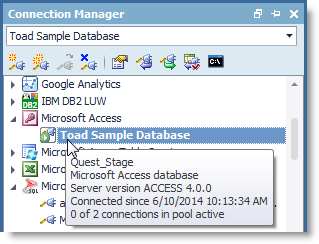
In Toad, a connection represents one or more actual connections to the database. Toad creates an initial database connection for general usage. It also creates a separate database connection for each Editor (the first time you execute a statement) and a separate database connection for each Data tab in the Database Explorer (the first time you select the tab and data is queried). The database connection for each Editor and each Data tab remains open until you close the associated window. However, the connections remain in an inactive state if a statement is not currently executing.
-
To see detailed information about a database connection, place your cursor over the connection name in the Navigation Manager or Connection Manager pane.
Switching Connections
Use the connections drop-down list located in the Connections toolbar to switch to another connection.
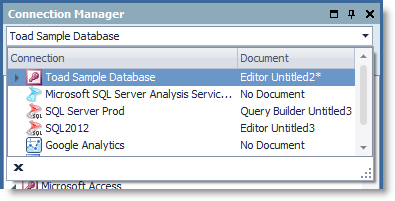
To switch to another open connection, thereby making that connection the active one, do one of the following:
- Select the connection from the open connections drop-down list in the Connections toolbar.
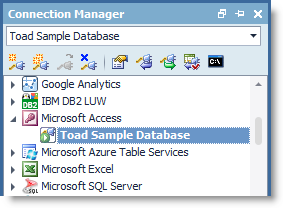
- Double-click a connection in the Connection Manager or Navigation Manager.
To Change the Connection for an Open Document
To change the connection for a single open document, with the document window selected do one of the following:
Note: This is not the same as switching the active connection for your Toad session, as described above.
- Right-click the document/window tab, select Change Connection, and then select another connection.
- Select another connection from the drop-down list located in the Status bar at the bottom of the Toad window.
Tips:
- The open connections drop-down list displays all your open connections.
- The open connections drop-down list also lists the open document associated with the connection (in the Document column).
- If you open a new document, Toad opens the document window and automatically applies the currently active connection (the one displayed in the Connections toolbar) to it.
Database connections can be created and managed using the Connection Manager (View | Connection Manager) or the Navigation Manager (View | Navigation Manager).
To Create a Database Connection
-
In the Navigation Manager, click
 to create a new connection.
Note: If the Navigation Manager is not in view, select View | Navigation Manager.
- Select a connection group (for the type of connection you are creating).
- Complete the information in the Login tab.
- Click Save to save the connection information in the Navigation Manager, or click Connect to save the information and connect to the database.
Notes:
- In Toad, your password is saved as obfuscated text.
- If you plan to use this database connection in an Automation script, you must save your password.
To Use the Navigation Manager
- To open a connection in the Navigation Manager, double-click the database name, or select the database connection and click
 .
. - To view the database connection’s Properties, select the database name and click
 .
. - To close a database connection, select the database connection and click
 .
.
To Import Connections
- To import connections from an xml file, click
 on the Connections Manager or Navigation Manager toolbar.
 - Browse to and select the xml file. Click Open.
- In the Import Connections dialog, select the connections to import and click Import.
You can connect to your database using a native Oracle database provider in Toad by using one of the following methods:
| Connection Method | Advantages | Disadvantages |
|---|---|---|
| Client connection (Client tab)— Uses an installed Oracle Client or Oracle Instant Client to establish a connection to the database from Toad. | Supports LDAP. See the online Help for more information about configuring the Oracle client to use LDAP. |
Requires an Oracle client. Note: Toad supports Oracle clients and Oracle Instant clients using version 9i or later. |
| Direct connection (Direct Connect tab)—Uses TCP/IP to connect directly to the database. |
Does not require the installation of an Oracle Client. Recommended for connecting to Oracle 8i databases. |
Only supports common data types. Some advanced Oracle object types cannot be retrieved when connecting using this method. Does not support LDAP. (To connect using LDAP, use the Client Connection method instead.) Cannot be used in a cross-connection query. |
|
Notes:
|
||
To Configure an Oracle Instant Client
The Oracle Instant client installs only those files needed to connect to your database using OCI. Because this client does not write to the registry (no ORACLE_HOMES) or add to the environmental path, you must manually set environment variables so the client can be used with Toad
- Save the Oracle Instant Client files in any location on the computer where Toad is installed.
- On your Windows desktop, right-click My Computer and select Properties.
- Select the Advanced tab and click Environment Variables.
-
Click New under System Variables and complete the following:
Variable Name Variable Value PATH <Path where Instant Client is installed>;%PATH%
For Example: C:\Program Files\OracleInstantClient;%PATH%
TNS_ADMIN <Path where tnsnames.ora file is installed>
Notes:
- If you are using the Oracle Instant Client, you must also install an Oracle ODBC driver before using this connection in a cross-connection query. (The full-install Oracle Client includes an ODBC driver.)
- You cannot use Oracle Direct Connection in a cross-connection query.
To Create an Oracle Connection
-
In the Navigation Manager, click
to create a new connection.Note: If the Navigation Manager is not in view, select View | Navigation Manager.
- Select the Oracle group from the Group list.
-
Complete the information in the Create New Connection dialog. Review the following for additional information:
Login Tab Description Database name Select the alias to use when connecting. This list displays aliases from LDAP as well as any local tnsnames.ora file.
Note: If you do not select a database, Toad uses the ORACLE_SID for the selected home. If an ORACLE_SID value does not exist and you do not specify a database, you cannot connect.
Password Enter the password to use when connecting.
Tip: After connecting, you can set a master password to further secure your connection in Tools | Options| Environment | Security.
Connect as Select whether to connect as either SYSDBA or SYSOPER if you have the appropriate permissions. Otherwise, use the default. Schema Select a schema if you frequently work in a different schema than the one associated with your user name. Explain plan table (Optional) Specify the location of an existing explain plan table to use instead of Toad automatically creating one for you when you execute a statement. This is useful if you do not have necessary permissions to create explain plan tables or want to use an existing table.
Category Select or create a category if you want to color code Editor tabs for a specific connection. This can help differentiate between development and production databases. You can also set an option to color code the Object Explorer pane and object editor windows (Create, Alter, Drop, etc.).
Save password Select this checkbox if you want Toad to save your password.
Notes:
- In Toad, your password is saved encrypted.
- If you plan to use this database connection in an Automation script, you must save your password.
Oracle Client Tab Description Current home Select client. TNSNames Editor Click this button to edit your local TNSNames file.
Tip: You can press CTRL+F to open the Find/Replace window to locate entries in the TNS Names Editor. Pressing F3 locates the next entry that matches your criteria.
SQLNET Editor Click this button to edit SQLNET.ORA parameters. Before editing this file, you should create a backup copy. See SQLNET.ORA Profile Parameters in the Oracle documentation for more information. Direct Tab Description SID Enter the ORACLE_SID value for the database. This value is specified in the registry under each installed home. Advanced Tab Description ODBC driver Select an ODBC driver to use in cross-connection queries.
If an Oracle Client is installed, the default is the Oracle ODBC driver.
If no Oracle Client is installed, the default is the Microsoft Access ODBC driver.
Tip: You can specify the ODBC driver to use for all connections for this database provider in Tools | Options | Database | Oracle.
- Click Save to save the connection information in the Navigation Manager, or click Connect to save the information and connect to the database.
Tip: Connections are stored in the connections.xml file and can be found by clicking the Application Data Directory link in Help | About.
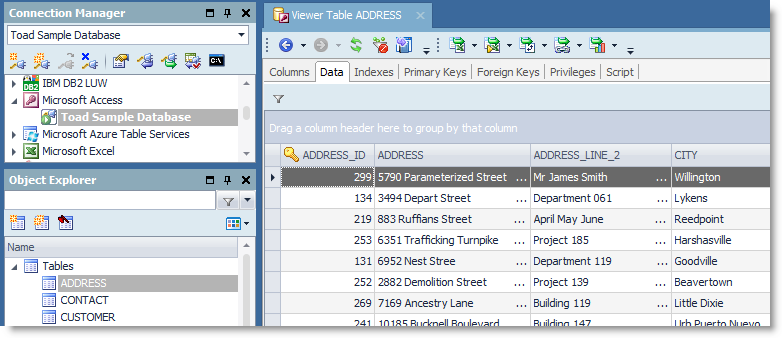
Toad Data Point provides two tools to let you view database objects:
- Object Explorer provides a list of database objects.
- Database Explorer allows you to view the details of database objects.
Object Explorer displays the database objects for the currently open (and selected) database connection. You can use Object Explorer to drag and drop database objects and tables into an open Editor or Query Builder window to help you build or compose a query (see Create Queries).
To Use the Object Explorer
-
Open a database connection in the Navigation Manager (double-click the database name, or select a database and click
).Note: If the Object Explorer pane is not in view, select View | Object Explorer.
-
In the Object Explorer pane, click
 to select an option for displaying the database objects.
Tip: Use Connection Treelist display to view all objects for all currently open connections.
-
Use the first text box / drop-down list to select a schema or to filter by a schema (not available when using a Treelist display).
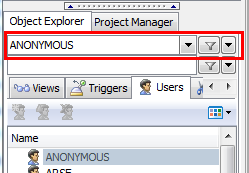
- Use the second text box to filter database objects.
Note: To learn how to use Object Explorer to easily build queries, see Create Queries.
Use Database Explorer to explore the details of a database or the details of a database object, including table properties, column attributes, indexing, keys, and data. You can also use Database Explorer to modify database and object properties, as well as data.
To Use the Database Explorer
- Open a database connection and display the database objects in the Object Explorer pane.
-
Select an object in the Object Explorer pane, then right click and select View Details, or select an object and go to Tools | Database Explorer.
Note: You can also select a database connection in the Navigation Manager, then right click and select New DB Explorer.
Toad Data Point provides two ways to create a query:
- Build queries visually using Query Builder
- Compose queries using the Editor
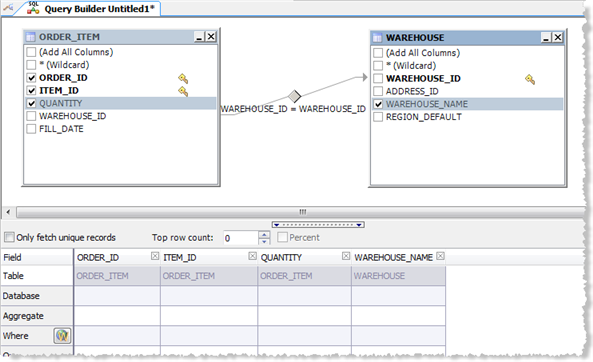
To Build Queries Visually
The Query Builder enables you to create a query without writing or editing SQL statements. Even if you are familiar with SQL, the graphical interface makes it easy to create relationships and visualize the query.
- Select Tools | Query Builder | Query Builder.
- Drag tables and views from the Object Explorer to the Diagram pane.
-
Join columns by selecting a column in a table and dragging it to a column in another table. A connector line displays between the two objects to visually represent the relationship.
Note: By default, all joins are initially created as Inner Joins. Double-click
 to modify the join type.
 - Add columns to the query using one of the following methods:
- Select each column you want to add to the query.
- To add all columns, select (Add All Columns).
- To add all columns to the query using a SELECT * statement, select * (Wildcard) . If selected, an asterisk displays for the Field name in the Criteria tab.
The selected columns are displayed in the bottom portion of the Diagram window.
-
To select the type of statement you want to create, click
 (the default is the Select statement).
Notes:
- The CREATE statement is only available for Oracle, DB2, SQL Server, and MySQL.
- If you select an INSERT, UPDATE, or DELETE statement after adding a single table or view to the Query Builder, you cannot add another table or view because it can only apply to a single table or view. Also, if you add more than one table or view to the Query Builder, this action is disabled because it only applies to a SELECT or CREATE statement.
- You can click
 to remove a column from the query.
-
Complete the query options. Review the following for additional information:
Query Builder Options Description Only fetch unique records Select this checkbox to eliminate duplicate records from query results. Top row count Enter the number of records that you want to return that have the highest values.
You can also select the Percent checkbox to select a percentage of records to return instead of an exact value.
Note: (For Oracle only) If you select a top row count and attempt to reverse engineer the query, the resulting query does not populate this field. Instead, the original query is placed into a subquery and the workaround wrapping SELECT statement is placed in the main Diagram page. The WHERE ROWNUM condition is placed into the Global Where clause.
Aggregate Function Select one of the following functions to calculate column values:
- Avg—Returns the average of the values in a group.
- Avg (Distinct)—Returns the average of the unique values in a group.
- Count—Returns the total number of items in a column. This function does not ignore NULL values when calculating results.
- Count (Distinct)—Returns the total number of unique values in a column.
- Max—Returns the maximum value for the column.
- Min—Returns the minimum value for the column.
- Stddev—Returns the sample standard deviation of a numeric expression evaluated over a set.
- Sum—Returns the sum of all the values in the expression.
- Sum (Distinct)—Returns the sum of all the unique values in the expression.
- Variance—Returns a statistical measure of how far a set of numbers are spread out from each other.
Note: If you add a Group By clause, you must specify an aggregate function for any remaining columns.
Where Condition Use to compose a Where clause or to add a subquery.
- Select the Where field in the column and click
 .
. - In the Where Condition editor, then do one of the following:
- Use the Where Condition editor to compose the clause. See Set Where Conditions in the online Help.
- Click Subquery in the editor to add a subquery. See Add Subqueries in the online Help.
- To learn about adding date ranges, see Set Date Ranges in the online Help.
Notes:
- If you reverse engineer a query that contains a Where condition from the Editor or edit it in the Query tab of the Query Builder, it displays in a Global Where clause bubble on the Diagram pane rather than the Where Condition field below the Diagram pane. You can double-click the bubble to edit the clause.
- You can also use the Where Condition to add the same column twice to the query.
Or Select the operators and expressions to add to the OR condition. Group By Select the column you want to add the Group By clause to and click +.
You can add a new Group By clause to any remaining columns to group them in sequence. Any remaining columns that do not have a Group By clause must include an aggregate function.
Tip: You can add a Group By clause to all selected columns in each table/view, by right-clicking the Diagram pane and selecting Add Group By.
Having Condition Select the operators, aggregate, and expressions to include in the Having condition. This option is disabled unless you have set a Group By clause.
Note: If you reverse engineer a query that contains a Having condition from the Editor or edit it in the Query tab of the Query Builder, it displays in a Global Having clause bubble (click here to see an example) on the Diagram pane rather than the Having Condition field below the Diagram pane. You can double-click the Global Having clause to edit it.
Sort Select an option to add this column to the Order By clause and specify a sort direction. Visible Select this checkbox to return this column in query results. This is useful if you need to include a column in the selection criteria, but do not need to display it in the query results.
Field Alias Enter a name to use as an alias for the column name in the query results. This is useful if you have an ID or vague column name and want to easily identify that column in the query results. Table Alias Enter a name to use as an alias for the table name in the query results. For example, if there are multiple employee tables that you need to join for the query, you can rename the tables to permanent, contract, etc., to easily identify them.
Note: If you selected All Columns for a table or created a column using the Edit Calculated Fields window, you cannot modify the table alias.
- Click
 to execute the query.
 - To save the query, right-click the Query Builder tab and select Save File. If you save the file as a Query Builder file (.tsm), Toad saves the current connection with the file.
Notes:
- To create a cross-connection query, click the arrow beside
 and select Cross-Connection Query Builder.
 - To view details for a table in the Diagram, press F4. If a table is not selected, details for the last selected table display.
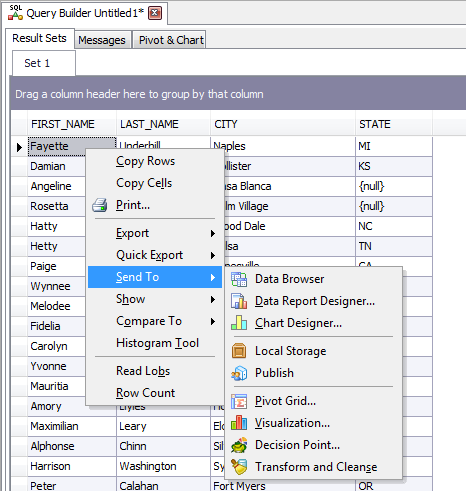
-
To create a data report, pivot grid, or chart from the data, right-click the data and select Send To | report_type.
To Use the Editor to Compose Queries
Toad Data Point includes a full-featured Editor for composing SQL statements.
- To open an Editor window, To open an Editor window, Select Tools | Edit | SQL Editor.
- Type your statement text.
-
To invoke the code completion feature, press PERIOD at the location where you want to display a list of objects.
Tip: You can specify the default options for using code completion in Tools | Options | Editor | Code Completion.
- To format the code, Select Editor | Format Code.
- To validate the syntax, highlight the block of code in the editor and select Editor | Check Syntax.
- To execute the SQL statement, click
 .
. - To save the query, right-click the Editor tab and select Save File. If you save the file as a Toad Editor file (.tef), Toad saves the current connection with the file.
Note: To create a cross-connection query using the Editor, Select Tools | Edit | Cross-Connection SQL Editor.
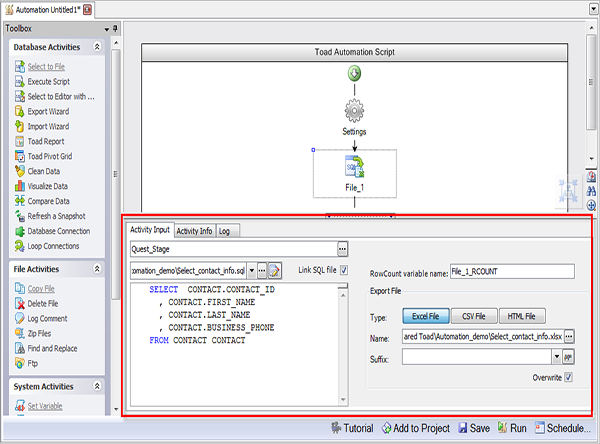
Toad Data Point provides an Automation tool that allows you to quickly create automation scripts that perform querying and reporting tasks, as well as a number of other activities. You can schedule querying tasks to run when database activity is light, save the results as Excel spreadsheets or Toad Reports, and then distribute the reports automatically.
To Create an Automation Script
- Select Tools | Automation.
- Before building your script, click Settings in the script design window and specify the script settings. Use the Activity details pane in the bottom portion of the Automation window to enter your settings. Review the following for additional information:
Activity Input Stop or continue on Error Select Stop On Error to stop the script if an error occurs. Send email when error occurs Select this option to send an email on script error.
If selected, you must also click Compose Email to compose the email message and to edit the Email Server Settings.
Note: When you specify the error email settings, Toad saves your settings and uses them in all subsequent automation scripts.
Use relative path to find SQL files Select to use a relative path that does not include the drive or full path for all activities in the script. This is useful if you want to share your automation scripts with colleagues, use them with version control, or place them on a shared network folder.
Embed SQL into Automation script Select to embed the actual SQL from SQL files in the script. This makes it easier to share the script with colleagues.
Truncate log Select to overwrite the log file each time the script runs. Run Mode Select Test mode to run your script in test mode using the database connection specified under Test settings.
Select Production mode to run your script in production mode using the database connection specified under Production settings.
Note: The default connection is the currently active, open connection.
Activity Info Name In the Activity Info window, enter a script name. -
To build your script, click an activity in one of the Activity groups in the Toolbox, or drag an activity from the Toolbox to the Automation script design window. Repeat this process to add additional activities to your script.
Note: You must drag the activity to
 . When you see the Activity icon replace , then release the mouse button.
 -
Select each activity in the design window and then specify the activity's properties in the tabbed Activity widows.
Tip: You can save an activity and its properties as a template to reuse in other scripts. Right-click the activity in the design window and select Save As Template. After you create the first template, a Templates toolbox displays.
Note: Click Settings in the design window at any time to go back and review the Automation script settings.
-
After you finish building your script, select one of the following actions from the Wizard bar:
Click this... To do this... Add to Project Add an automation script to the current project in the Project Manager. The script is automatically placed in the project's Automation Scripts folder. Save Save an automation script (.tas) in a folder on a local or network drive. Run Test an automation script before scheduling it. The script executes once and the execution log is displayed in the Log window. Resolve any problems that cause activities to fail or disable failed activities before scheduling the script.
Tips:
- Press F5 to run the automation script.
- To view the script log, select the Log tab or select View | Output.
Schedule Schedule an automation script in the Job Manager. You can schedule a script to execute once or to run repeatedly at a specific interval.
 Back To Top