|
Learn more about Toad for SQL Server Find solutions and downloads at the |
|
Learn more about Toad for SQL Server Find solutions and downloads at the |
|
Toad for SQL Server 6.6 |
Summary
This tutorial helps you get started with Automation by giving you an overview of the Automation module and then guiding you through the process of creating a basic script.
In this tutorial you will learn:
Toad provides an Automation utility that allows you to easily script database activities and schedule them using the windows scheduler. In this way, database tasks can be automated to save you time. Toad Automation can increase your productivity by allowing you to automate tasks that you perform repeatedly.
The Benefits of Using Automation
* Did You Know *Opening the Automation WindowThere are several ways to open an Automation window.
|
To get started with Automation, open an Automation window by selecting Tools | Automation.
The Automation window consists of a Toolbox pane (along the left side of the window), a design pane (top half of the window), and a details pane (bottom half of the window).
Toolbox—Stores the Automation activities. Single click an activity in the Toolbox to add it to the script design pane. Activities are listed by category: Database, File, or System.
Script Design Pane—Graphically displays the script as a workflow. Use the script design pane to build an Automation script. Single-click an activity or drag it to the design pane to add the activity to a script.
Note: You must drag the activity to one of the ![]() (Add Activity icon) in the Automation workflow, then release the mouse button after you see the activity's icon replace the
(Add Activity icon) in the Automation workflow, then release the mouse button after you see the activity's icon replace the ![]() .
.
Details Pane—Displays an activity’s settings. Click an activity in the design pane to display its configurable settings in the details pane. Use the details pane to specify the settings for each activity in the script.
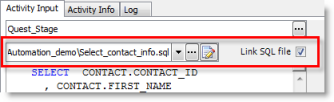
With the Select to File activity still selected in the script design pane, view the details pane. The details pane allows you to configure settings for the selected activity. The input fields change depending on which activity is currently selected in the design pane.
Note: The Activity Input tab is the tab where you will specify most of an activity's settings.
Click ![]() next to the Select to File activity. Toad uses this icon to indicate that more information is required to complete the activity. Click or hover over the icon to display the missing information. Use this icon to help you determine which input fields are required.
next to the Select to File activity. Toad uses this icon to indicate that more information is required to complete the activity. Click or hover over the icon to display the missing information. Use this icon to help you determine which input fields are required.
Note: This icon is also used to indicate a validation error, for example, when referencing a variable that has not been created yet.
Now click the Settings icon in the design pane. The details pane changes to display input fields for the script’s settings. You can use this area to specify script error handling, logging level, and run mode settings.
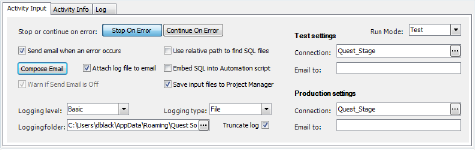
Click the Stop on Error button, if not already selected. This instructs the script to stop if an error is encountered.
Note: You can also enable or disable the Stop on Error option for each individual activity. If you know that a particular activity will have an error, you can disable the Stop on Error option for just that activity. This option is located on the Activity Info tab for each activity.
In addition to selecting the Stop on Error option, enabling the Send email when error occurs and Attach log file to email options is also preferred. This can be very useful if your script encounters an error. Enabling your script to send an email notification on error, as well as on success, helps you to feel confident that your processes are running as expected.
If you choose to enable these options, you must specify email settings. To specify email settings, click the Compose Email button.
In the Activity Input tab, in the first text box, select a database connection, or use the default. The default database connection for each database activity is always the currently-active open connection. To select a different database connection, click ![]() and browse to a different connection.
and browse to a different connection.
Note: If you schedule a script to run against a password-protected database for which you did not save the password in Toad, the script will error. To save the password, right-click the connection in the Connection/Navigation Manager and select Properties. Enter the password and select the Save Password option.
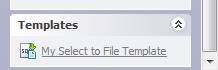
You now have a complete activity, with input, output, and database connection specifications. You can save and reuse this activity in other scripts by saving the activity as a template. To do this, right-click the activity (after configuring all the settings) and select Save As Template. Enter a name for your template and click OK to save it.
Your template now appears in the Toolbox in the Templates category.
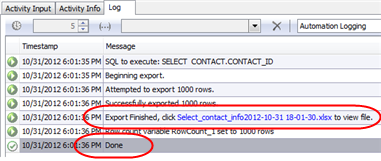
While the script is running, Toad displays your script’s execution progress in the Log tab. The message “Done” indicates script execution is finished.
If you require a more detailed Log, you can change the logging level. In the Settings’ Activity Input tab, select Verbose from the Logging level drop-down list to create a more detailed log.
Note: If you want to change the location of the Log file, select a new location in the Logging folder input field.
Toad allows you to specify both a Test database connection and a Production database connection for each script. Toad also allows you to specify which connection to run your script against when the script executes. Both of these settings are made in the script’s settings. This feature allows you to easily test your script in a test environment before running your script in the production environment.
To specify a test and a production database, make the selections in the Connections text box under Test settings and Production settings on the Settings’ Activity Input tab. To select which of these databases to run your script against, select test or production from the Run Mode drop-down list.
If you remember from the overview of the Automation window, Toad allows you to enable or disable each activity in a script. This can be helpful when building a script, as it allows you to test one particular activity at a time by disabling the other activities.
In the Activity Info tab, click Disabled to disable the Select to File activity. Notice that the activity now appears shaded in the design pane. To enable the activity again, click Enabled, or right-click the activity in the design pane and select Enabled.
Once you have thoroughly tested your script, you can schedule it.
The Job Manager window opens and a task properties dialog displays. The task properties dialog is pre-populated with the information required to run your script as a scheduled task. You only need to supply your password and then schedule it. (The Job Manager uses the Windows Scheduler.)
To supply your password, on the Task tab, click Set password. Enter the password for the account under which the task will run.
Note: If the account password changes, you must update the password in the scheduled task also.
Your task (script) is now listed in the Task List in the Job Manager. Double-click your task in the list to open the task properties dialog again where you can make modifications, such as re-scheduling or changing the script location. Use the Task List to review the status of your tasks (scheduled scripts).
Note: Use the task properties dialog to upgrade your scheduled scripts after you upgrade to a new Toad release.
Now you have learned how to increase your productivity by using Toad Automation to handle your repetitive reporting and deployment tasks!
Other Toad Automation tutorials are available. To see more examples and to learn how to build other types of scripts to automate everyday tasks, start with the following: